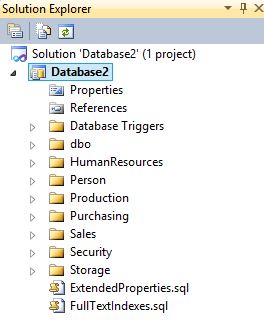
SQL Server Data Tools, SSDT, is a plugin to Visual Studio 2010 and later, with the purpose of enabling an integrated development environment, including database development in Visual Studio.
In this blog post I’ll present a introduction to SQL Server Data Tools – SSDT, and it’s major features.
Integrated Development
The ultimate goal of SSDT is to create a more integrated development environment. Traditionally, database development has often been done outside of Visual Studio, for instance in SQL Server Management Studio. With SSDT, database development is instead done inside Visual Studio. Databases are included as projects in the Visual Studio solutions.
When adding a database project, make sure that the correct template is used:

Importing databases
To get started using the project, the database must be imported into Visual Studio. This can be done in some different ways. First, it can be imported from a previously created “dacpac”. To create a dacpac from Management Studio (2012 version), right click the database -> “Tasks” -> “Extract data-tier application”. This will open the following wizard:
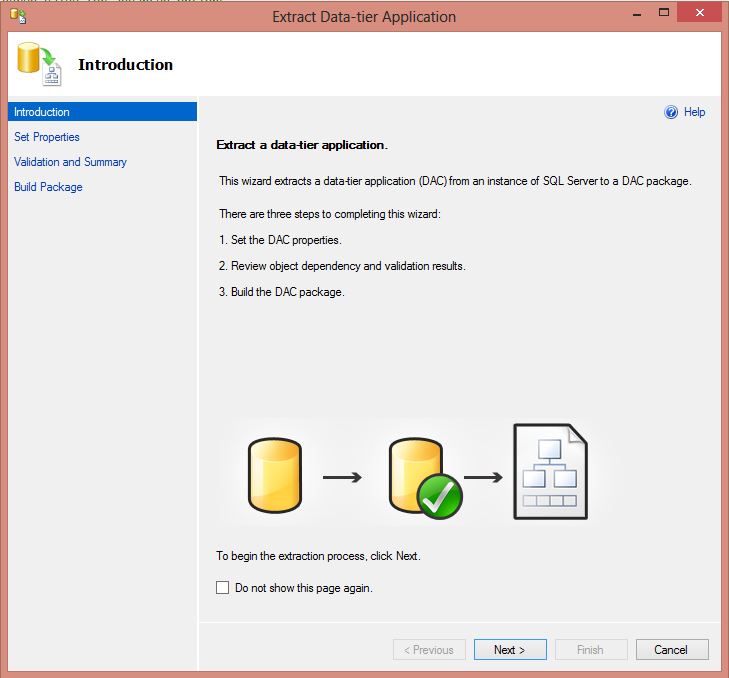
The wizard is self explanatory, just select a location for the dacpac file. When the export is finished, the database can be imported to Visual Studio via the following dialog:
Just point to the location where you just placed the dacpac.
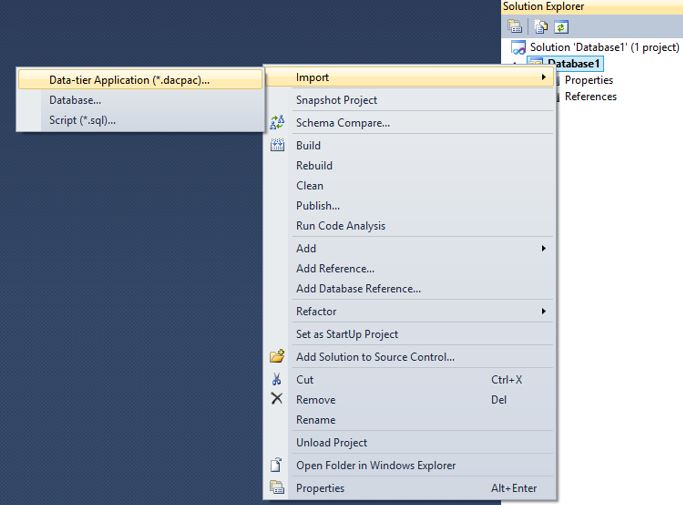
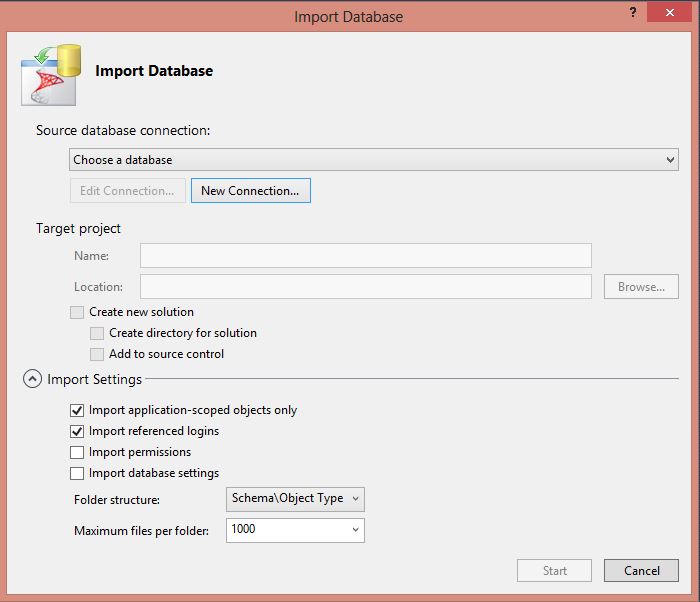
The other way is to extract the database directly from the database server source:
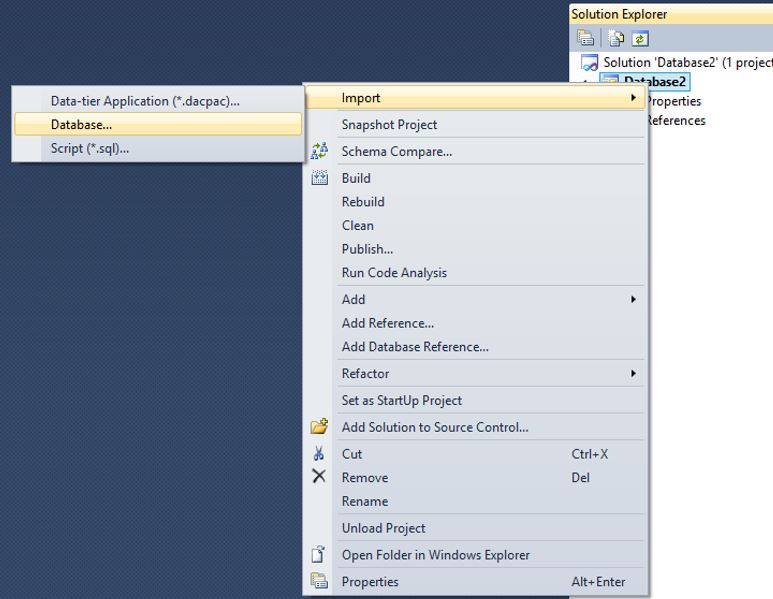
The following wizard is displayed:
Either method, the result is a new project being created. I am using AdventureWorks2012 in this demonstration:
Target Platform
From the properties of the project, you can see the chosen target platform for the project. This setting is important, since SSDT will make sure your code works on the platform you have chosen.
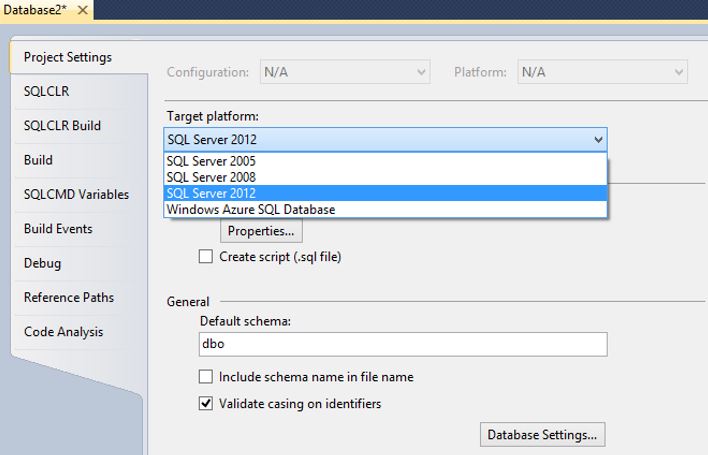
This setting is especially important if you are developing for the Azure platform, which has some special requirements.
Source Control
As expected, the database objects can be added to the preferred source control application. So when branching or merging or doing other source control management, the database is actually included, which is a major advantage. When I am writing this blog post I don’t have access to any source control, but the process to add the database to source control is no different from other project types.
Declarative Development Model
A new declarative development model is used in SSDT. What this means is that you declare how the database should look like, not how to accomplish that. Actually, all objects are stored as “CREATE” statements. Whether to issue a CREATE or ALTER statement when deploying is now a deployment issue, rather than a development issue.
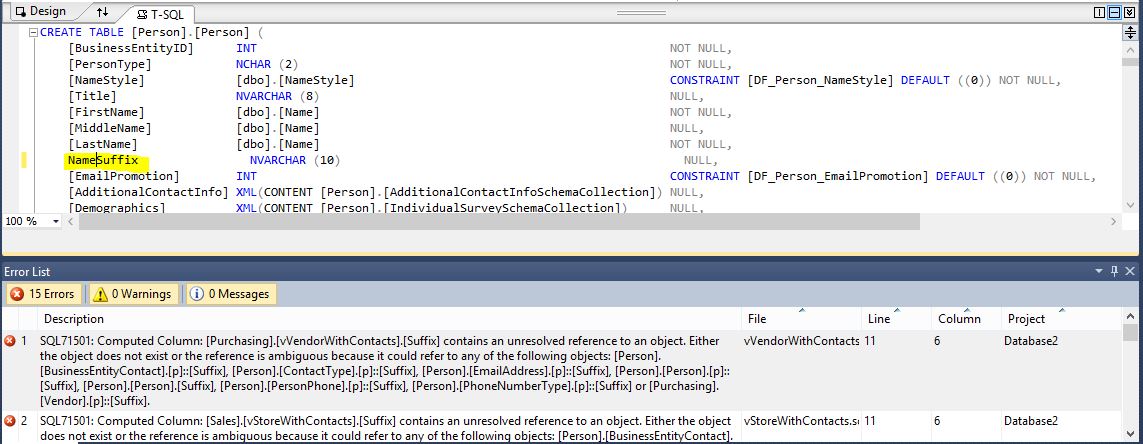
If you double click on the table Person.Person for instance, a window with both a design and a T-SQL mode is displayed:
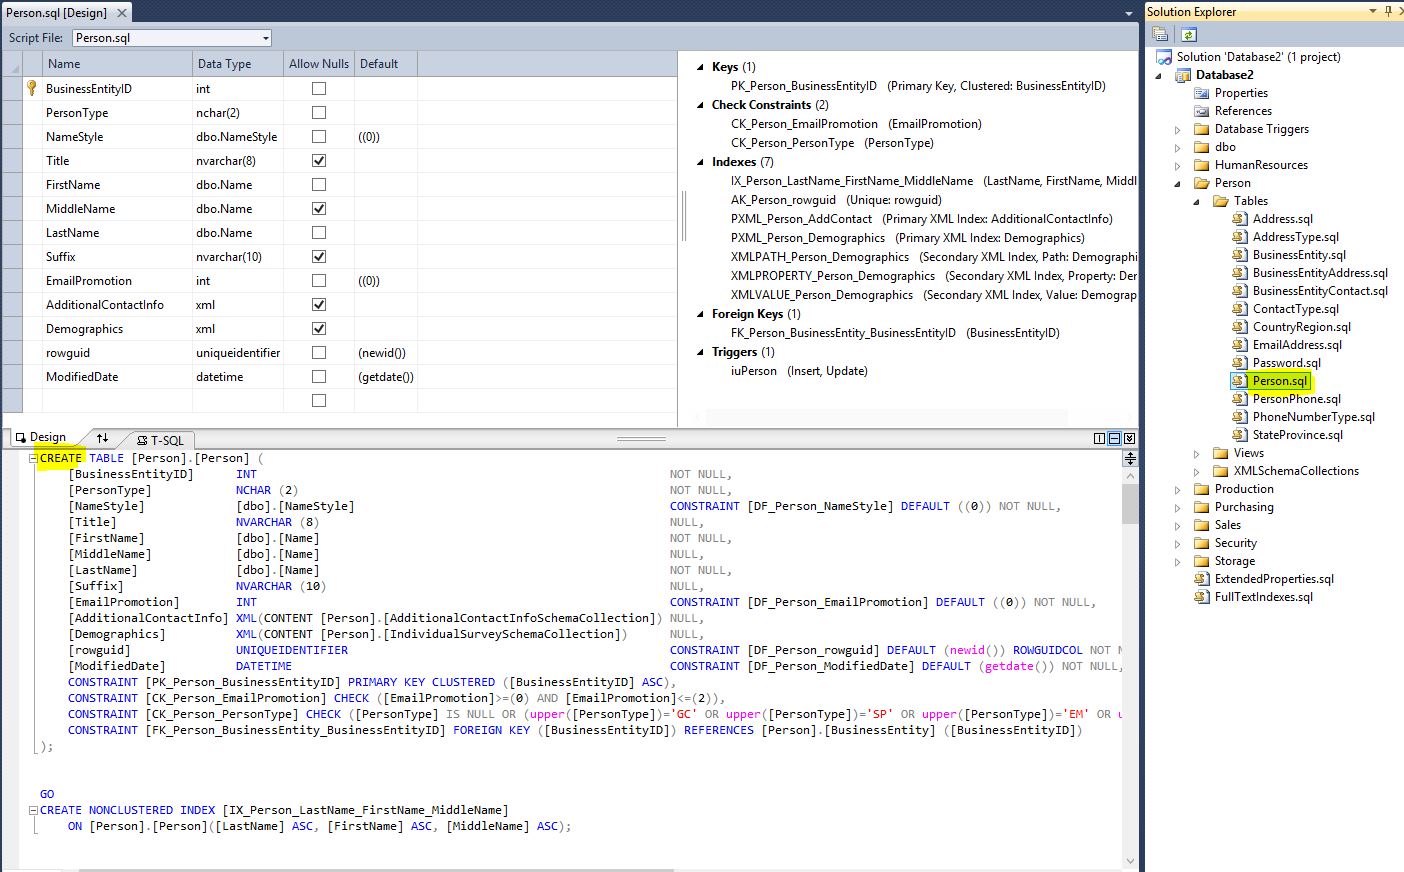
In these windows, the declaration of table objects in the database is managed.
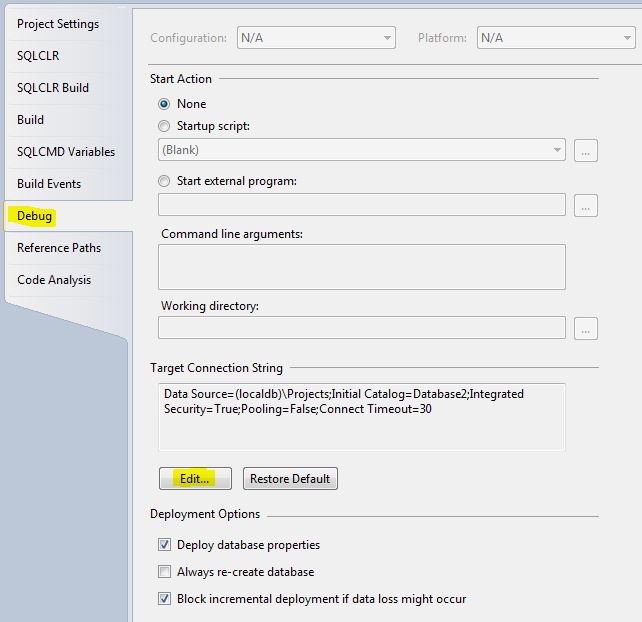
Disconnected Development
A local temporary instance of the database (localDB) is created on your development machine when opening the Visual Studio project. So for development purposes there is no need to connect to a database server. Note however that this local database is just an empty model, it does not contain any data. This is important to remember when debugging procedures requiring data to function. In the SQL Server Object Explorer window, both normal database servers and the new development instance of the database / project can be viewed:

A very serious limitation is that localDB currently does not support the enterprise/developer features of SQL Server. I created a table with compression enabled in SSMS, imported as project to Visual Studio, and when I tried to deploy the solution in Visual Studio I ended up with the following error:

SQL72014: .Net SqlClient Data Provider: Msg 7738, Level 16, State 2, Line 1 Cannot enable compression for object ‘T1’. Only SQL Server Enterprise Edition supports compression.
There is a connect item about it here.
To change to a more traditional connected development model, for instance if you have Developer Edition installed locally, open the project properties window and change the debug database in the marked sections:
Schema Compare
The schema compare function compares objects between your Visual Studio project and a database (server or local). A list of differences is presented, and you can apply the changes if you like.
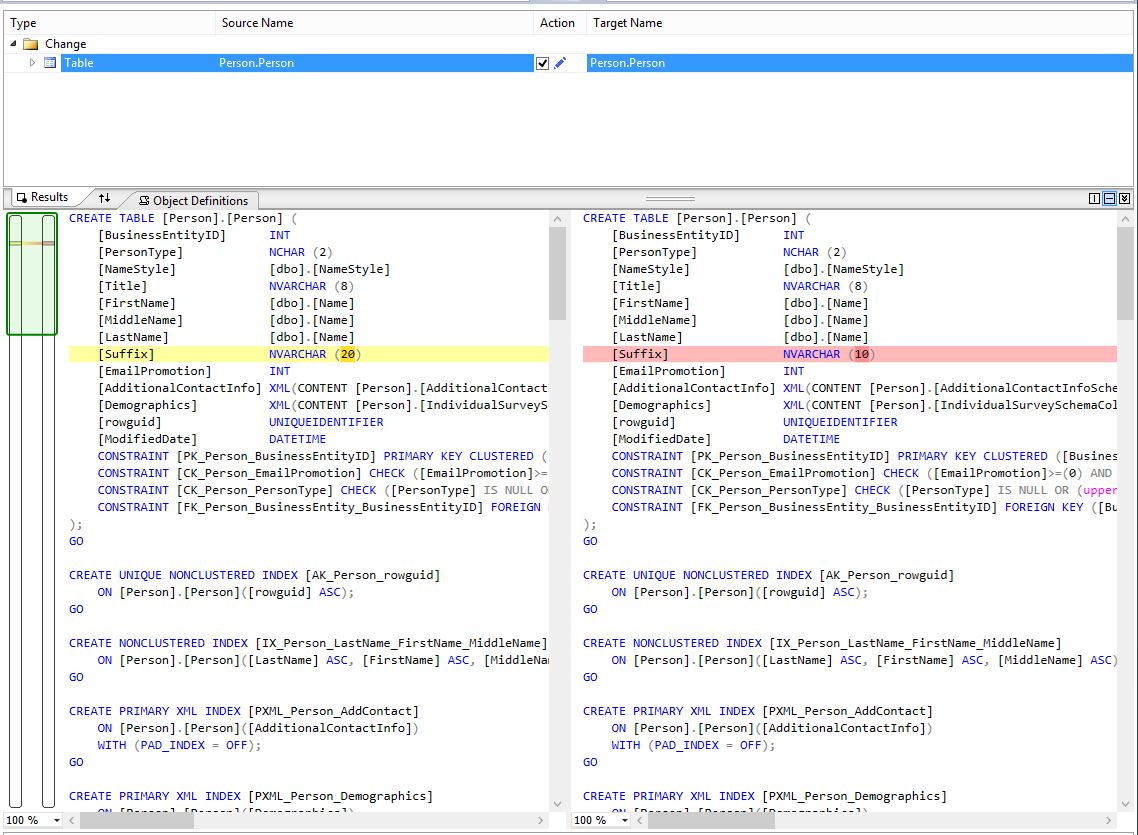
To illustrate this, I changed the column Suffix to NVARCHAR(20) from NVARCHAR(10) in the Person.Person table:

Note that this change was made in the project. Now we can compare the project with the database on the server to see if the change is spotted. To open the schema compare window, right click on the project and select “Schema Compare”. In the top of the window, the source and the target of the compare are selected:

Running the comparison, our change will be highlighted in the resulting window:
In the upper toolbar, a set of options are now visible:

Here are buttons for “Update”, which means the target will be updated with the selected changes, and the “Generate Script” button which will create a sql script. (Note that there are other (more natural?) methods to deploy changes than to do it via the schema compare tool. See the Deployment section below.) The “Options” button will open a dialog with a lot of Schema Compare Options:
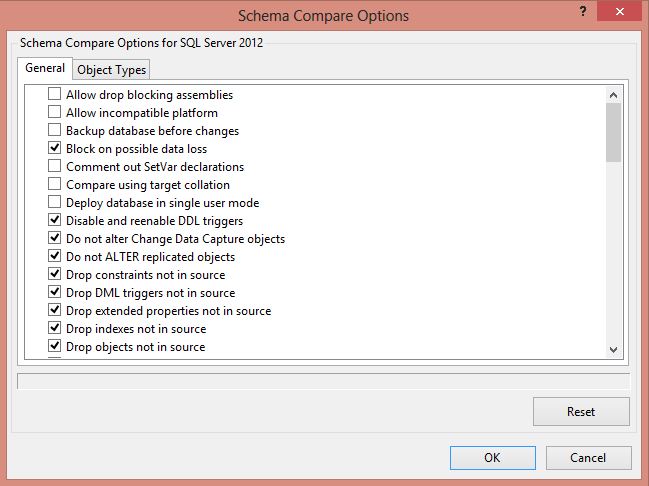
There are too many to go through them all here, but I’ll mention the “Block on possible data loss” that I strongly recommend setting to on (should be on by default). Block on possible data loss means an upgrade of the database will stop when there is a risk of data loss.
Refactoring
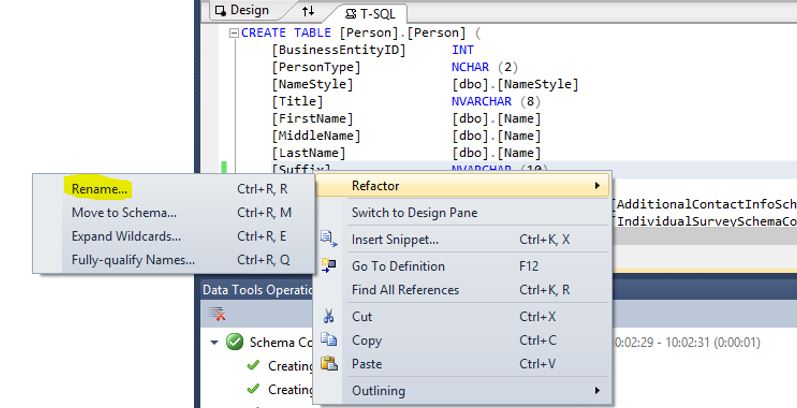
This is something missing a long time for database developers using SQL Server Management Studio. Let’s rename the column “Suffix” in the table Person.Person to “NameSuffix”.
Open up the T-SQL view of the table and right click the column. This will display the Refactor menu:
Select the “Rename” option and type NameSuffix as the new name. This will open the “Preview Changes – Rename” window:
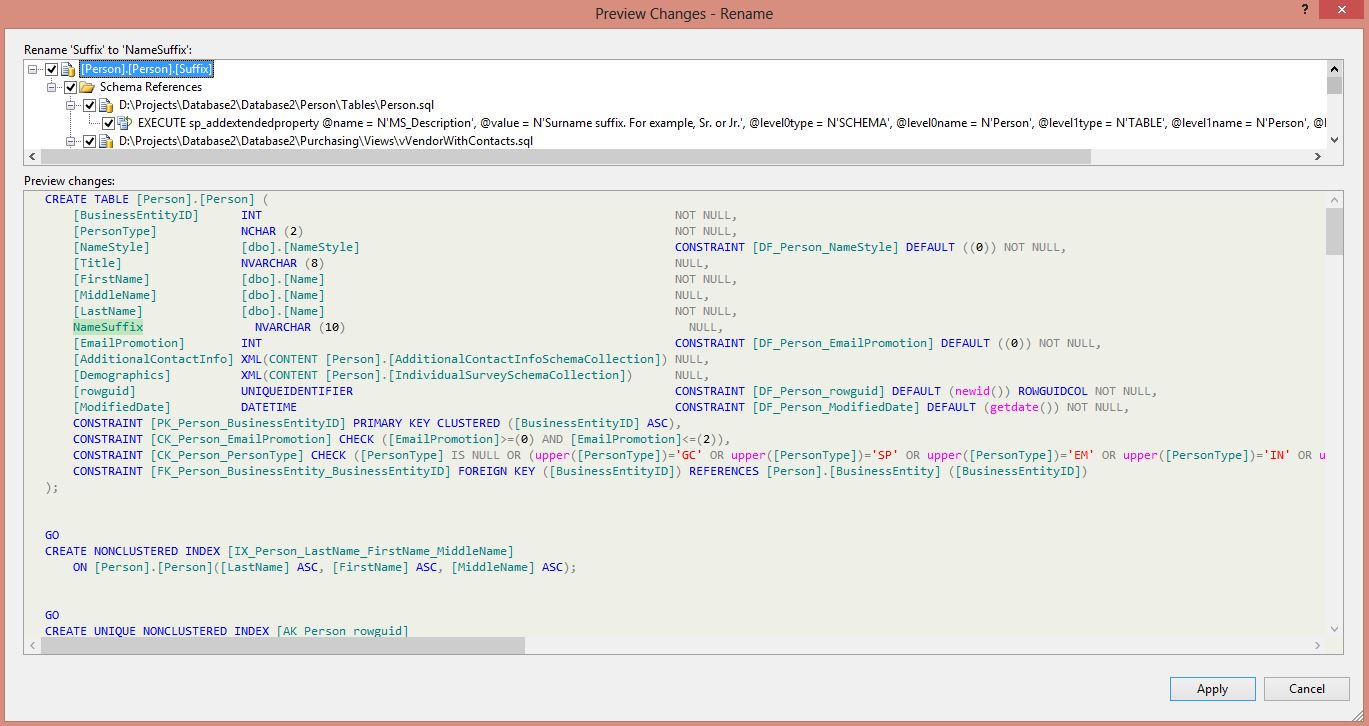
This window summarizes all the changes that need to be executed in order to change the column name in a safe way. If you want to continue with the column rename, just click “Apply”.
Improved Error Detection
When you develop databases in SQL Server Management Studio, there is no sure way of knowing that a dropped or changed column won’t cause other objects to fail. For instance, a view created without the “WITH SCHEMABINDING” can fail if the underlying table or one of its columns is dropped.
If we try the same in Visual Studio / SSDT, the error gets detected. Making the same change on the column Suffix on table Person.Person as above, but without the refactoring, the following errors are displayed immediately:
Build And Deployment
If you build the solution, a dacpac file is created in your bin\Debug folder. This dacpac file is then used when deploying the new version of the solution. Let’s create a small change in the database project to view how the change finally ends up in the database. Again, make a change to the column Suffix in table Person.Person and change it from NVARCHAR(10) to NVARCHAR(20).
Then, build the solution. Open up SQL Server Management Studio and right click on AdventureWorks2012 and select “Tasks” -> “Upgrade Data-tier Application”. Click “Next” on the first dialog to appear, and point to the created dacpac in your bin\Debug folder. In the next step, any eventual changes in the database that are not included in the dacpac are displayed. More on this in the section about Drift below.
Select “Rollback on failure” according to your deploy routines. Continue in the wizard, and a compare between the dacpac and the target database will be made. You’ll then see the “Review” dialog where the changes that will be made are summarized:
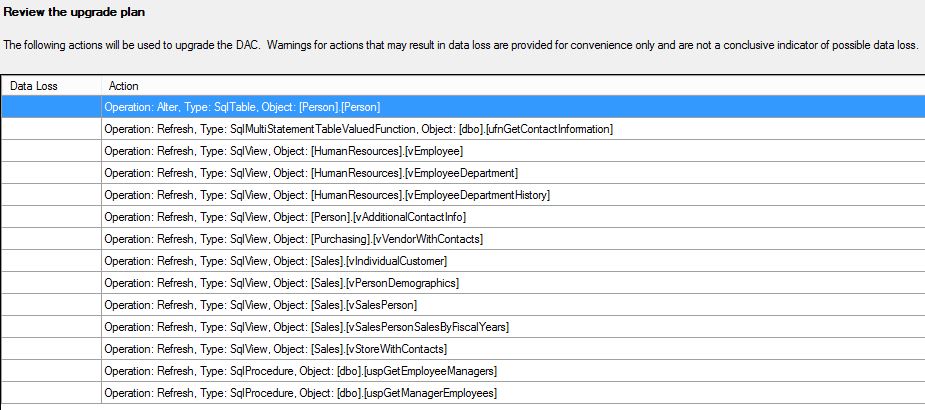
There is also a button to “Save Script”. This creates a sql file with the changes that will be made. This option is a good way to document the deployment of the application. Continue to click Next to finish the deployment.
Avoiding Data Loss
The change in the above demonstration of deployment was very simple and risk free, since all we did was to increase the length of a column. But what if we were to decrease the length of the column instead? Then we introduce the risk of data loss. Let’s see how this is handled. Change the column Suffix back to NVARCHAR(10) from NVARCHAR(20) and deploy.
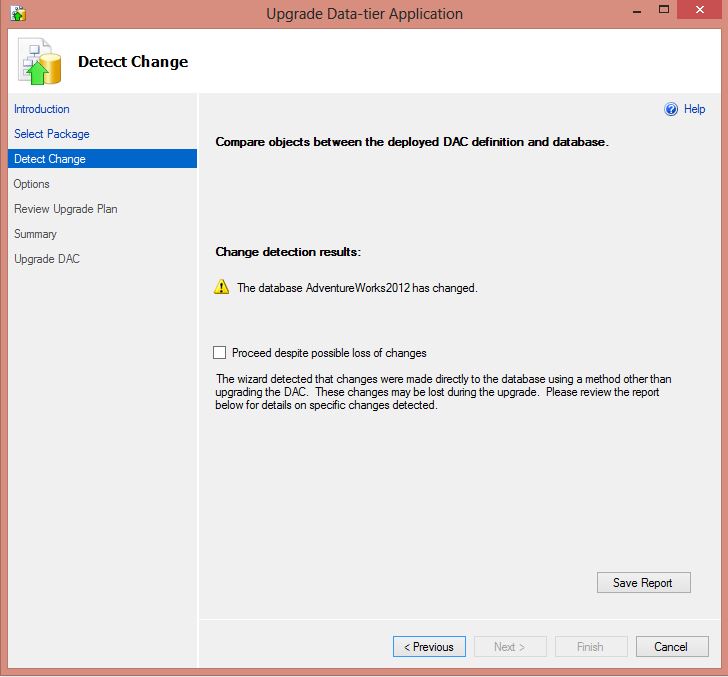
Once again, upgrade the database with the “Upgrade Data-tier Application” wizard. This time, on the review page, there will be a warning of possible data loss. And we need to accept the possibility of data loss before the “Next” button is enabled:

Controlling Drift
Database drift happens when changes are made in the database that is not included in the project. Depending of your practices, there can be a risk of database drift since a DBA or someone else can have made changes to the database since the last deploy / export.
Drift must often be handled manually, checking with the developer / DBA responsible for each individual drift. A decision has to be made, whether to include the drift in the project or to delete the drift from the database.
Note however, that this is really not a new problem introduced with SSDT. Rather, with SSDT we are made aware of eventual drift problems.
Let’s see how database drift is handled.
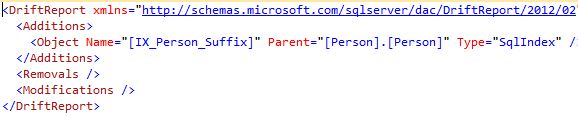
In SSMS, create a new index on the table Person.Person:
CREATE NONCLUSTERED INDEX [IX_Person_Suffix] ON [Person].[Person]
(
	[Suffix] ASC
)
GO
In Visual Studio, deploy the solution. In SSMS run the wizard to “Upgrade Data-tier Application”. In the step “Detect Change”, a warning will now be raised. You’ll need to accept the risk of dataloss before you can proceed:
To review the drift, click on “Save Report” to save the summarizing drift report. The drift report consists of three parts, Additions, Removals and Modifications:
Drift management should be a part of most deployment procedures. However, you don’t need to wait until deployment to see the drift. Just use the schema compare, as described above.
Dependencies
Since importing to your Visual Studio solution is done at the database level, there may be references to other databases that are not included in the solution. There may even be references to other servers (linked servers). How are these issues handled by SSDT?
Dependencies to other databases
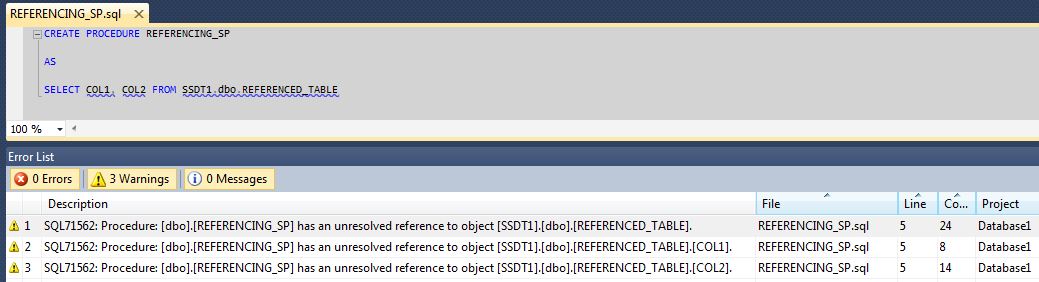
First, let’s set up a demo with two databases. One (SSDT1) with only a table and the other (SSDT2) with only a stored procedure referencing the table in SSDT1.
Run the following T-SQL script to set it up.
CREATE DATABASE SSDT1
GO

USE SSDT1
GO

CREATE TABLE REFERENCED_TABLE
	(
		COL1 INT,
		COL2 VARCHAR(10)
	)
GO

INSERT REFERENCED_TABLE VALUES (1, 'TEST1'), (2, 'TEST2')


CREATE DATABASE SSDT2
GO

USE SSDT2
GO

CREATE PROCEDURE REFERENCING_SP

AS

SELECT COL1, COL2 FROM SSDT1.dbo.REFERENCED_TABLE
GO
Next, create a Visual Studio project based on the database SSDT2. Check the Error list to see that Visual Studio has detected the unresolved reference to SSDT1:
Somehow, we need to make a reference to the database SSDT1 in the project. Fortunately, there is a existing mechanism in Visual Studio to handle this. Right click “References” under the project folder in Solution Explorer and choose “Add Database Reference”:
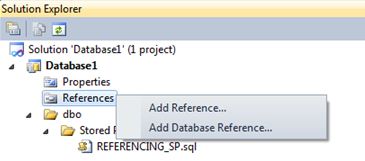
This will present you with the following options:
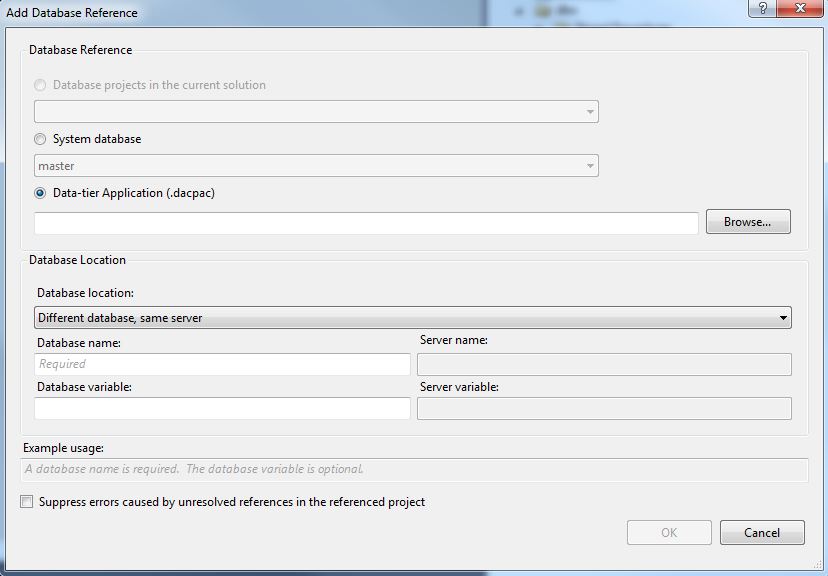
The best scenario here would be if your referenced database as well is included as a project in the solution. If so, just choose the first option, “Database projects in the current solution”.
If your reference is to a system database, choose that option.
The last alternative is to reference a dacpac. So to do that, we first have to create a dacpac on the database SSDT1. Problem is, if we choose this option to resolve references, we also have to maintain the dacpac to keep it current. That is why the first option is much preferred. Then your references will always be up to date and working.
So create a dacpac for database SSDT1 and reference to it in the dialog like this:
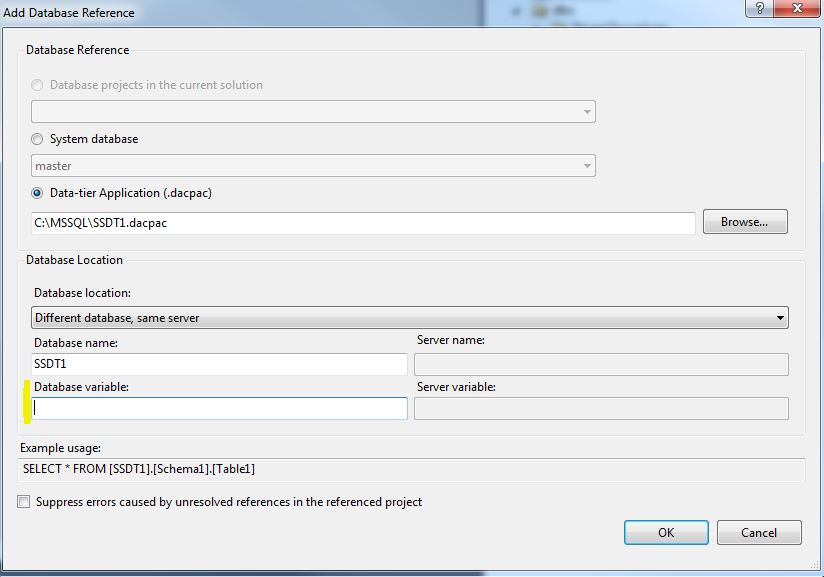
Important to note here is that I have removed the value in the “Database Variable” field. This is because upgrading dacpacs on the database don’t work anymore if you use variables. You will get the following error message:
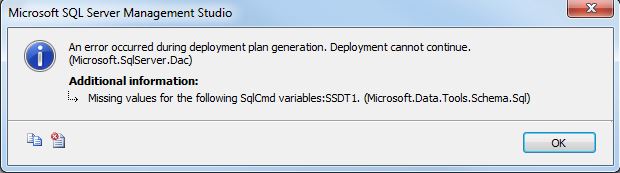
An error occurred during deployment plan generation. Deployment cannot continue. (Microsoft.SqlServer.Dac) Missing values for the following SqlCmd variables:SSDT1. (Microsoft.Data.Tools.Schema.Sql)
See Jamie Thomsons blog post A dacpac limitation – Deploy dacpac wizard does not understand SqlCmd variables for more information on that.
After adding the reference, the warnings in Visual Studio should be gone.
Dependencies to other servers
What if the reference is to another database on another server? The same method is used, the “Add Database Reference” dialog. Just use the option “Different database, different server” under “Database location” and type the name of our other server:
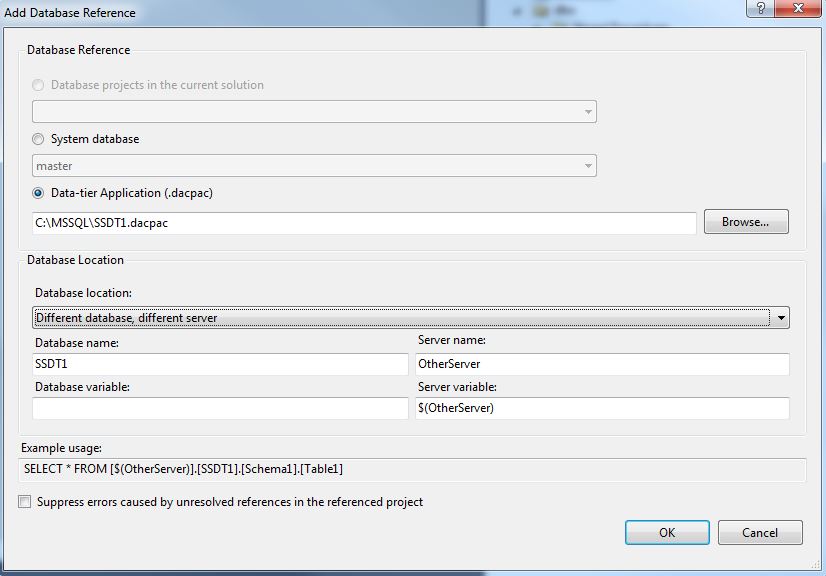
Problem here is, the “Server variable” field is mandatory. So if you make use of these references to other servers, upgrading the database with a dacpac stops working with the error message shown above.
If you, despite the fact that upgrades won’t work, decide to use the reference to other server feature, the syntax in the stored procedure now needs to be changed to:
SELECT COL1, COL2 FROM [$(OtherServer)].SSDT1.dbo.REFERENCED_TABLE
Since upgrades via dacpacs won’t work, your options are to use the command-line tool sqlpackage.exe or to use the “Publish” feature:
I will not cover publishing in this blog post, just make sure there is a linked server set up matching the variable before you publish. Also note that none of the alternatives will help in detecting database drift, so if you need to manage drift you have to do it manually via schema compare.
Pre and Post deployment
Only metadata is managed by SSDT, not the data itself. However, one way to add data to your project is to make use of the Pre- and Post-deployment sql script that can be added to the solution.
Right click somewhere in the project tree add select “Add” ->; “Script” to get the following dialog:
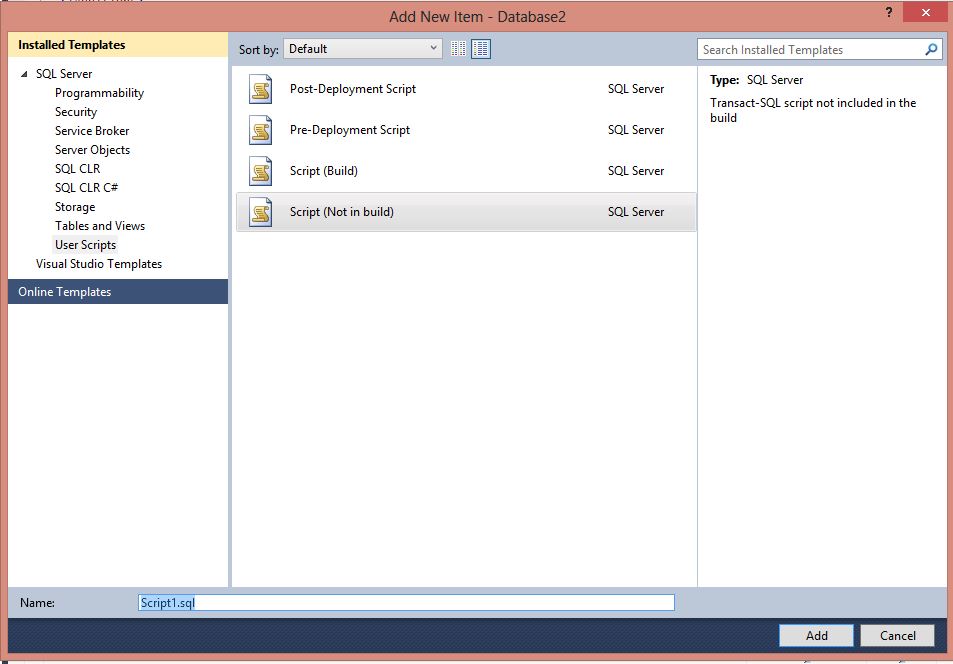
Post-Deployment Script
Script will be run last in the deployment.
Pre-Deployment Script
Script will be run first in the deployment.
Script (Build)
Script is included in the build (check for errors and warnings).
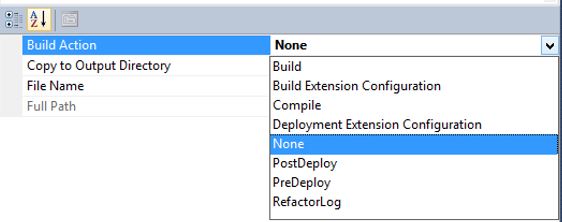
Script (Not in build)
Script is not included in the build (no check for errors and warnings). This script type can be used to temporarily save scripts when there are errors. Else a build will fail. This can be changed later with the “Build Action” setting in the properties dialog on the file. The options are displayed below:
Database Project Snapshot
Database Project Snapshot is simply a dacpac saved in the project. Can be very useful to save different project states as restore points.
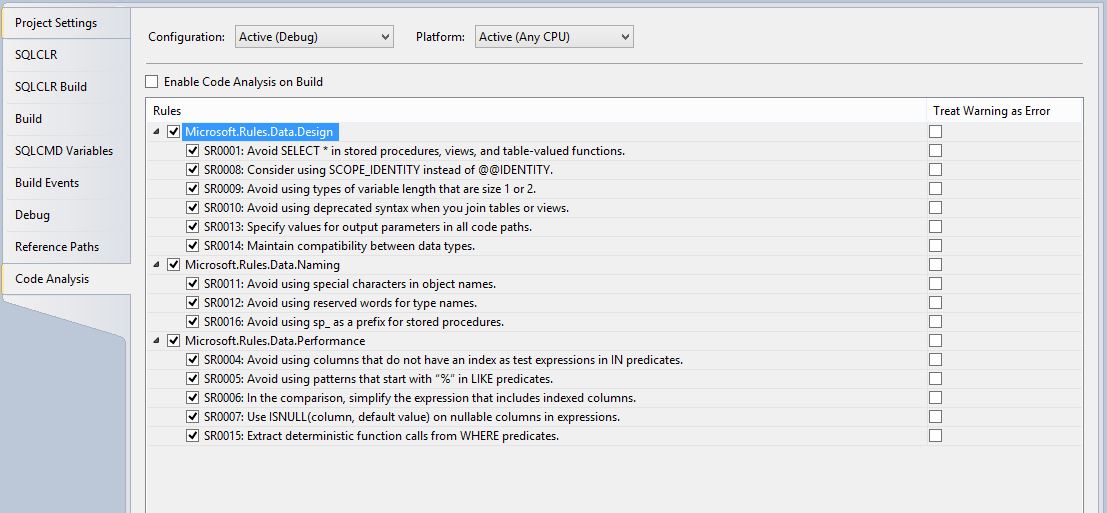
Code Analysis
The option to include “Code Analysis” can be found in the project properties, under the “Code Analysis” section. The purpose of code analysis is to ensure different database development standards are met. A couple of examples are not to issue “SELECT *” statements and not to use search patters starting with “%”. The complete list looks like this:
BIDS
BIDS, or Business Intelligence Development Studio, is another plugin to Visual Studio. The tool is used to develop Integration Services Packages, Analysis Services solutions and Reporting Services reports. Unfortunately, SSDT and BIDS are unaware of each other, which mean that for instance dependencies are not included in refactoring and in error handling and warnings.
SSDT or SSMS?
Traditionally, a lot of database development has been done in SQL Server Management Studio (SSMS). The emergence of SSDT doesn’t remove the need for SSMS however. Classical DBA activities will still be managed from SSMS. Like backup, SQL Agent jobs, handling index fragmentation and so on. And of course, deploying dacpacs!
More information on SSDT can be found at the Microsoft site for SQL Server Data Tools.

I have a question related to the compare of the db solution and a dacpac, I’m using SqlPackage.exe for the comparison but when I have the result I saw that the comparison was included all the stored procedures that are using the linked server although they have not been modified, could you please help me with this?
If the solution and the dacpac are using the same SQL Server verison, I don’t know what else could cause the diff.
Hi – I am writing to see if you might be able to help me…I am using the dacpac to deploy to a High Availability / Always On database environment. there are three servers – a listener and two additional. When I try to deploy the Listener (since you should not access the sync db servers directly), I am getting the following error:
Publishing to database ‘ISIS’ on server ‘ISISQAListener’.
Creating [ISIS]…
An error occurred while the batch was being executed.
*** Could not deploy package.
Error SQL72014: .Net SqlClient Data Provider: Msg 15247, Level 16, State 1, Line 1 User does not have permission to perform this action.
I have checked all the permissions, etc. However, I am unable to determine what the right approach should be. Am I supposed to do something else?
Thanks for your help in advance,
Hi, I haven’t encountered that error I’m afraid… But still I think the error strongly suggests that somehow there are insufficient permissions for the user doing the deploy…
Regards,
Tomas
Hi, one question to scenario 1 on DB references: DB on the same server, switched to diff-db—same-srv and using the DB-variable, but nevertheless errors concerning broken references occur…
What could this mean? Shouldn’t the SSDT substitute the variable in the code through the given value? Or need I to use the checkbox “Suppress errors caused by unresolved references…” to overcome some first deployment hurdles (egg&chicken-problem) and on the 2nd run uncheck this and being done?
This I have on a VS2013.5+SSDT+TeamFoundationServer2013, when trying to build a *.sln out of the Source Control Explorer. But anything looks like with a colleage, who have it working…
Any hint would be highly appreciated, thanks in advance for a reply.
Hi Stefan, do you use database references somewhere in your code? Check this out. Some tips here as well.